About POS mining!
- POS mining – Proof of Stake, a cryptocurrency mining scheme that has numerous advantages. There’s no need to constantly monitor expensive high-end graphics cards or configure costly ASIC equipment. For this type of mining, almost any old PC, laptop/netbook, or relatively cheap mini-PCs like Raspberry Pi, Arduino, and their analogs will do. The only important thing is to have the coins, and they will generate profit, with the income level depending solely on the number of coins purchased.
How to mine?
1 — To mine coins, you need equipment. The simplest options are PCs, but to save even more electricity, you can use a laptop or netbook with Windows/Linux operating system. You can also use paid virtual VPS servers, such as those from zomro.com
2 — You need a wallet for the required operating system, which you can download from here –https://github.com/cryptadev/vqr/releases
3 — Most importantly, you need the coins themselves, which can be bought on one of the exchanges listed on the main page.
In simple words about the same Mining!
- When adding funds to your wallet, an address is created, and 1,000 coins are sent to it. You now have 1 address and 1 input of 1,000 coins.
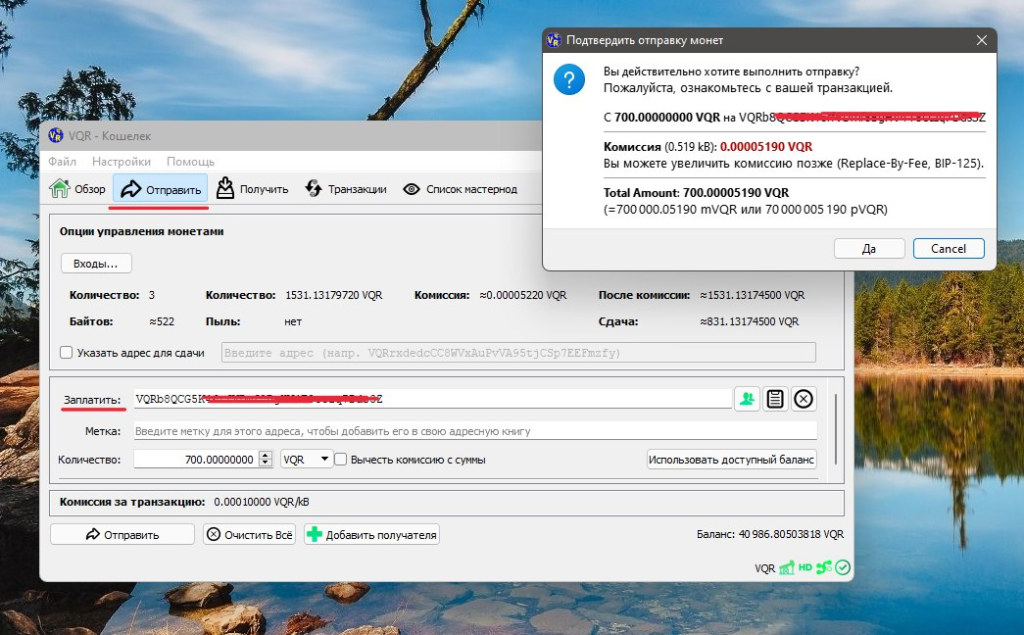
- If you need to send 100 coins to a friend and you only have a single denomination of 1,000 coins, the wallet will take the 1,000 coins and send 100 coins to your friend’s address. The remaining 900 coins, or the change, will be sent to a newly generated address within your wallet. It’s similar to moving money from one pocket to another within the same wallet. During the transaction, you can specify where to send the 900-coin change, whether back to the same address or a different one. After the transaction, you will have two addresses and two inputs: one with 100 coins and another with 900 coins.
- In POS mining, a similar transaction occurs. Let’s look deeper: Proof of Stake is a proof of ownership, and how do you prove you have money? Correct, you take it out of your pocket and put it back. During POS mining, a random transaction is created to an internal address, say, for 400 coins, and the remaining 500 coins are returned to the wallet marked as change.
- So, POS mining involves moving money from pocket to pocket within the same wallet while simultaneously receiving a reward and breaking large denominations into smaller ones. In the end, you have many small inputs/denominations and many pockets/addresses, which is quite safe and anonymous.
- The larger the denomination of the input, the greater the chance of successfully completing POS mining after maturation. Smaller denominations wait longer for their turn.
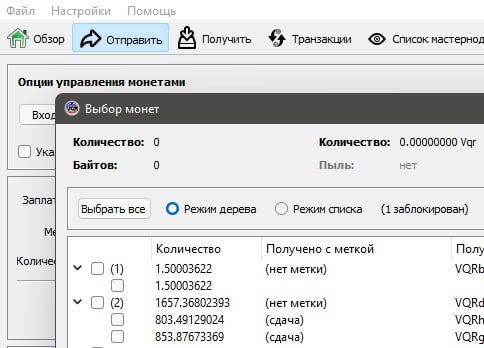
- For clarity: in the settings, you can *enable coin control*, which will add an *inputs* button to the *send* menu. This will display the various addresses and coin denominations. This feature allows for more precise management of coin transactions.
Cold/paper wallet
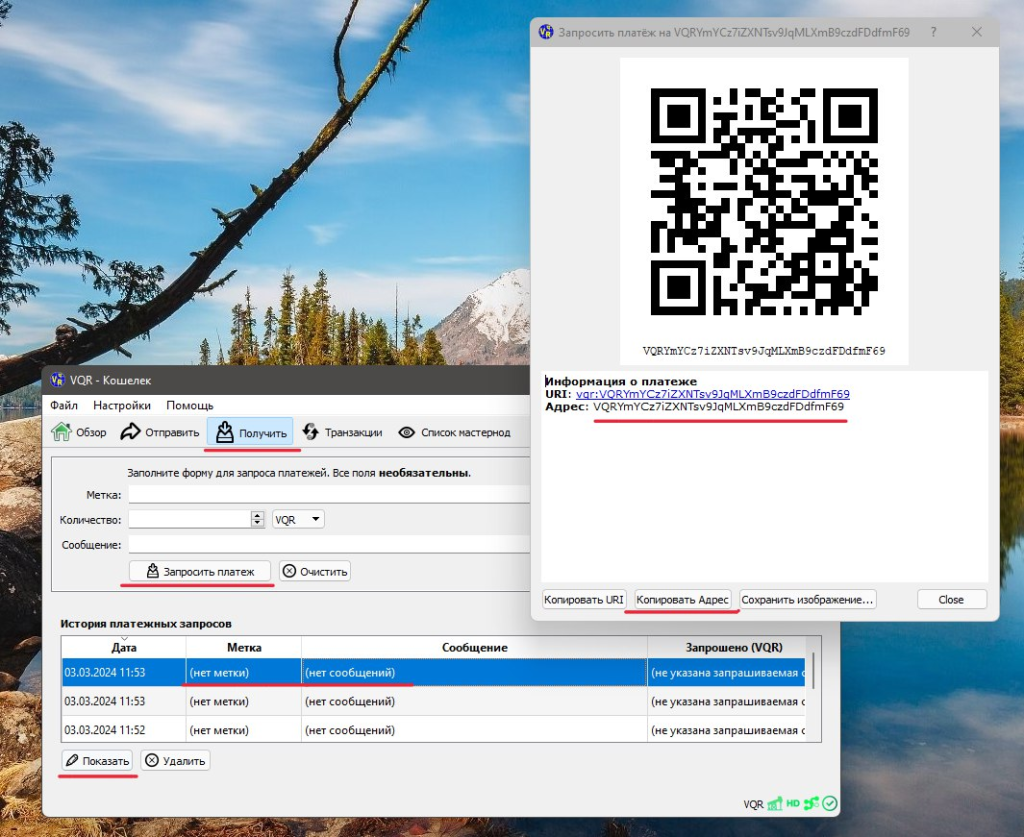
- In our PC wallet, there is an option to create a convenient, practical, and most importantly, MAXIMALLY secure PAPER WALLET, which can be used without actual paper.
Various online services for generating paper wallets for Bitcoin can be found and used. When you visit any of these websites, a public address and a private key for the Bitcoin wallet are generated. For ease of use, you can convert this data into QR codes and print them on paper, hiding the private key in a secure place while using the public address for funding the wallet. Since the private key is only stored on the printed paper and not accessible online, such a wallet can be considered quite secure, provided that all files related to this wallet are deleted after printing, making hacking virtually impossible.
- However, there is one “BUT.” With a simple paper wallet, if you print the private key and somehow lose it, access to your coins will be lost.
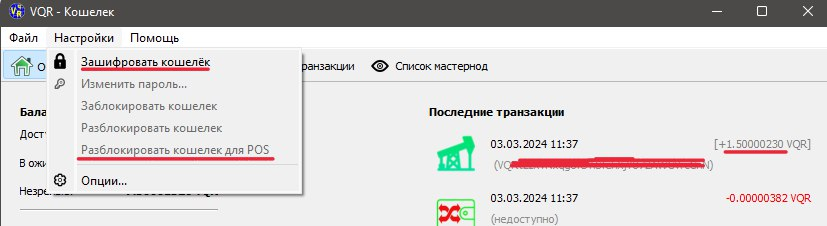
To avoid such situations, in our VQR wallet, copying and printing the private address is not necessary, as only the password you created in the initial setup will be important.
How does our paper/cold wallet work?
- You need to come up with a sufficiently complex (yet easily memorable for you) password and remember it. Naturally, you can use combinations of letters and numbers, but the main thing is that you don’t forget this combination in the future.
- In the wallet console, you need to enter the command:
genpaper vqr_password_1
- where “vqr_password_1” is your reliable password.
You will receive a response like this:
{
“human”: “vqr_password_1”,
“Private”: “MaKtMPjo491x8wvxpiw5tCjgHDFqYd36M5ZXx7tdQ9rsptw8ZojchV”,
“PrivateHex”: “89fff01b768906527d06ace1ea1e2c28c7934e2276bd1234d40efb0a162f1ead”,
“PublicHex”: “0206099856a531ff3f05fd74b9ca938ca43b485e393b03874794274d67dda44cbe”,
“Address”: “VQRsMVL6rTP4LRdwarswkgTPrwywnNSvudx3”
}
- The values you need are:
“Private”: “MaKtMPjo491x8wvxpiw5tCjgHDFqYd36M5ZXx7tdQ9rsptw8ZojchV”
“Address”: “VQRsMVL6rTP4LRdwarswkgTPrwywnNSvudx3”
- Each time you run the paper wallet generation command with your password, the same private key and public address will always be generated. This means you only need to remember your password, and printing the private key on paper, as described earlier, is no longer necessary; you can simply keep the password in mind.
- Don’t forget to clear the console window after obtaining the necessary wallet information.
- You can use this wallet address for deposits and to check the balance in the explorer.
- In the PC wallet, you can add your address with the following command:
importaddress VQRsMVL6rTP4LRdwarswkgTPrwywnNSvudx3
- This will display the address balance in the wallet, but it will not allow you to spend the funds.
- Command in the PC version of the wallet
importprivkey MaKtMPjo491x8wvxpiw5tCjgHDFqYd36M5ZXx7tdQ9rsptw8ZojchV
- will add coins to the wallet and open access to transactions from this address.
- Of course, you can write down your password somewhere, but since it will be an unremarkable phrase or set of characters, it will be very difficult to determine how and where to use such a key/password (unlike a simple private key, where it’s easy to guess that it’s a private key, import it into a wallet, and thereby spend or steal it).
- Attention! You can repeat the wallet generation command from the example to confirm that you’ll receive the same private key and address as shown here, but we do not recommend using them for sending personal coins, as the wallet is compromised and anyone who wants to can access the coins stored there.
About masternodes
How do masternodes work?
- Masternodes are servers that provide additional network security and maintain a full copy of the blockchain while offering second-layer services such as instant transactions.
- To operate a masternode, a collateral of 400 VQR coins is required, and in return for their services, masternodes receive regular payments.
Setting up a masternode
Step 1 – Send 400 VQR coins to your address.
Step 2 – Wait for 12-15 confirmations for the sent transaction.
Step 3 – Go to the “Help” menu – Debug Window – Console – enter the command:
masternode_create
Step 4 – Go to the “Settings” menu – Options – Open Configuration File – add the line:
masternode=1
Save the file and restart your wallet. After some time (about half an hour), the masternode will start automatically.
You can use the cheapest virtual machine on one of the similar services, such as zomro.com
Don’t forget that a static IP and an open port (9987) are required for the masternode.
How to open a port on Windows10, and Linux Ubuntu,
In short, on Linux, you can open the port with the following commands:
sudo ufw allow 9987 or sudo iptables -I INPUT 6 -m state –state NEW -p tcp –dport 9987 -j ACCEPT
Linux - Masternode - Console
masternode=1 : enable masternode
stakegen=1 : enable POS mining
stakerepeataddr=1 : 1 same pos-address, 0 different.
externalip=IPadress : if needed
The commands are written to control the console version, but all these commands are also applicable for the QT version in the wallet console but without the ./vqr-cli prefix
./vqr-cli getwalletinfo : balance
./vqr-cli sendtoaddress “address” 400 : send coins
./vqr-cli masternode_create : create a masternode
./vqr-cli masternode_status : masternode status
./vqr-cli listtransactions : list of inputs
./vqr-cli masternode_genkey : for manually creating a masternode
./vqr-cli resendwallettransactions : resend a stuck transaction
./vqr-cli stop : stop the wallet
./vqrd -daemon : launch the console version of the wallet
sudo apt install wget -y
wget https://github.com/cryptadev/vqr/releases/download/0.17.3/vqr-0.17.3-x86_64-linux-gnu.tar.gz : Download the wallet (verify the link to ensure the wallet version is current)
tar -xvf vqr-0.17.3-x86_64-linux-gnu.tar.gz : Extract the files
rm vqr-0.17.3-x86_64-linux-gnu.tar.gz : Delete the archive
./vqrd -daemon : Start the wallet. For the initial startup, allow about 30 minutes for the blockchain to load and sync. Proceed with the next steps only after synchronization is complete. For subsequent starts, 5-10 minutes should be sufficient.
./vqr-cli getnewaddress : Generate a new address
./vqr-cli dumpprivkey “address” : Save the private key
Step 1 – Send 400 VQR coins to your address
./vqr-cli sendtoaddress “address” 400
Step 2 – Wait for 12-15 confirmations for the transaction.
Step 3 – Go to Help menu – Debug Window – Console and enter the command
./vqr-cli masternode_create
Step 4 – Open the configuration file and add the following line
nano .vqr/vqr.conf
masternode=1
externalip=IPaddress (if required)
Save the file and restart the wallet. After about an hour, the masternode should start automatically.
./vqr-cli stop
./vqrd -daemon
If for any reason your masternode does not start automatically:
**Step 1** – Start the wallet, create an address, send 400 coins to it, and wait for 15+ confirmations.
**Step 2** – In the console, enter the command `masternode_genkey`, copy the resulting value, which will be a string like `5fN39fA*********************ZHCUt9kwG`, and save it in a text file to avoid losing it.
**Step 3** – In the console, enter the command `listtransactions` and find the transaction involving 400 coins. Look for a line with `”amount”: 400.00000000`. You will also need the lines `”vout”: 0` and `”txid”: “5ccd3f**********ed36d7a2db”`. Copy the values `5ccd3f**********ed36d7a2db` and `0`, and save them in the same text file where the masternode key is stored. Turn off the wallet.
**Step 4** – In the folder containing the wallet files where `wallet.dat` and `vqr.conf` are located, create and open a file named `masternode.conf` if it does not already exist. Write the previously obtained data in one line, separated by spaces:
`alias IP:port masternodeprivkey collateral_output_txid output_index`
where `alias` is a label for the masternode (e.g., MN1), your IP and PORT (e.g., `127.0.0.1:9987`), `masternodeprivkey` is the key from Step 2, and `collateral_output_txid` and `output_index` are the values from Step 3. The final line should look like:
`mn1 172.72.72.172:9987 5fN39fA*********************ZHCUt9kwG 5ccd3f**********ed36d7a2db 0`
Save and close the file. Open the `vqr.conf` file, add the line `masternode=1`, save, and close it. By default, WINDOWS will load the directory here: `C:\Users\Your_Username\AppData\Roaming\VQR`.
**Step 5** – Start the wallet, and if you encrypted it, you will need to unlock it. If everything is done correctly, the masternode should start within half an hour.
ctrl+o – save! and then enter
ctrl+x – exit back to the console
Coin profitability assessment!
- 1. According to the emission terms, we receive a reward of 2.5 coins per block every 2.5 minutes.
- 2. 1,440 coins are generated per day, with 40% allocated to masternodes and 60% to mining.
– 1,440 * 0.4 = 576 VQR goes to masternodes, and 864 to mining.
- 3. Masternodes:
– If there are 30 active masternodes, each receives 576 / 30 = 19.2 VQR per day.
– To start a masternode, you need to buy 400 coins, so the return on investment is approximately 400 / 19.2 = 21 days.
- 4. Mining:
– There are over 1,800,000 coins in circulation, assuming that only 1 million are used for mining.
– This means the total power of 1 million generates +864 VQR per day.
– 5,000 * 864 / 1,000,000 = every 5,000 VQR will approximately yield +4.32 VQR per day.
– Buy 5,000 coins, mine, and compare with the expected earnings.
- For reference: if the number of mined coins is less than calculated values, the total network power is above 1 million. If earnings are higher, the power is below 1 million coins.
- By substituting current quantitative values from our explorer and the coin price, you can estimate potential earnings in fiat currencies from mining VQR coins.
If you have any additional questions, feel free to ask them in our chats!